Best Practices and Performance Tuning

We aim to help our clients get the most out of their cloud computing experience. This document applies to all cloud computing platforms, private or public. Cloud desktop (VDI) performance depends heavily on the VDI resources and network connectivity.

If a client is experiencing poor VDI performance, this is due to one or a combination of the following points below, and in most cases, the reason for poor performance can be self-diagnosed.

Causes for poor performance

  1. Low VDI resources, not enough CPU, RAM, Disk, or GPU resources. VDIs are similar to physical desktops, and some applications could require more resources
  2. Poor LAN quality due to aging or misconfigured equipment at our office
  3. Poor WAN quality due to a subpar circuit from the carrier
  4. VDI misconfiguration
  5. Some applications have optimization settings to maximize user experience. For example, videoconferencing applications like MS Teams, Zoom, or 3D graphic design software will require optimization.
  6. Reboot your VDI weekly. VDIs are similar to physical desktops; they require routine reboots to clear memory leaks and bugs related to software applications
  7. Running VDI over WIFI is not recommended. Most WIFI networks are not appropriately sized and can easily be interfered with, potentially causing streaming platforms like VDI, voice videoconferencing applications, and graphics design software to hesitate, creating a poor user experience.

For Example:
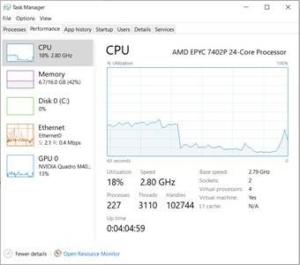
  1. If the VDI resources are low, you can view this in Microsoft Windows by selecting the Task Manager and the Performance tab (see below) and seeing your resource utilization. Anything above 85% is considered high, and a resource upgrade is recommended.
  2. Cloud Desktop CPU

  3. If the LAN or the WAN is poor, this will require a more thorough assessment by an A2000 engineer; however, you can run a simple 5 minutes test utilizing the following tool to determine this. http://visualware.advance2000.com/myspeed/ispcheck.

    This test requires you to run it directly from a local PC connected via a wire, NOT over WIFI, and NOT from your A2000 VDI, and from where you desire to test the quality of the LAN or WAN. See below.

    MOS Score Cloud Desktop

  4. Mean Opinion Score (MOS) is a measure used in the domain of Quality of Experience and telecommunications engineering

    How to interpret your results?

    If your MOS score is below 4, your LAN or WAN or both are poor quality or defective - Your office network hardware, service provider connection one, or both are over-utilized, misconfigured, require an upgrade, or are faulty.

    Analyze your download and upload speeds; if they are below our recommendation, you should consider upgrading your service provider connection. We recommend minimum downloads and uploads of 10 Mbps and 5 Mbps for each VDI user. For example, a 5-user office operating over the Internet will require a minimum of 50 Mbps download and 25 Mbps upload as minimum capacity.

  5. Other recommendations:

    • Subscribe to a private vs. an Internet circuit to connect to their cloud resources whenever possible. The A2000 carrier team can help clients with circuit subscription and carrier selection.
    • Replace PCs with a thin client or lock office PC to simulate a Thin client. Thin clients are optimized for VDI use, are more secure, and require less maintenance.
    • Have two circuits per office and from alternate carriers. The primary circuit is dedicated to production work and a secondary for guests, WIFI, and local Internet access for non-cloud desktops. This practice will also provide you with better security.
    • Keep video streaming in a window mode, not in full HD, as this will rob valuable bandwidth from other users on your network, and do not stream videos or music that doesn't relate to your business needs.
    • Use wired network connections vs. wireless whenever possible.
    • Use the latest VMware Horizon client rather than the HTML to connect to your VDI.
    • Switch the cloud desktop background screen to a basic theme and turn off animations.
    • Use Blast protocol as the default unless the A2000 support team instructs otherwise.

    All these best practices will optimize your performance, improve your security and enhance your cloud computing experience.


    Windows 10

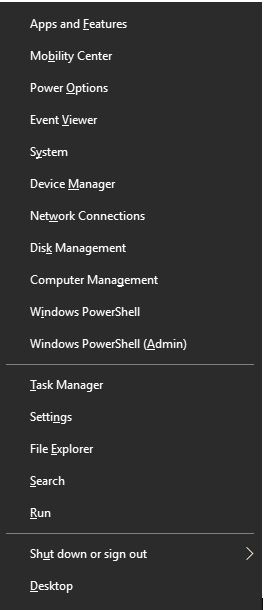
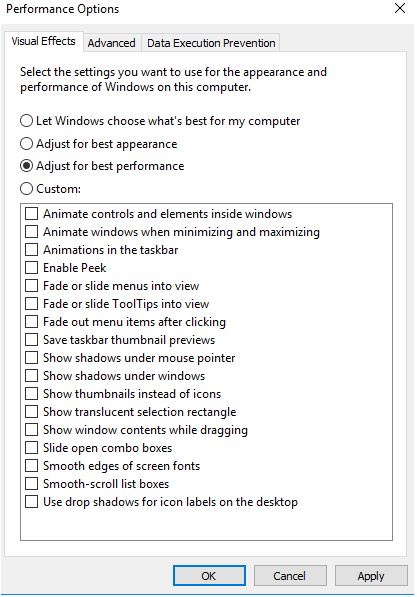
    1. Press Windows Key + X combination to see the following menu.
      VDI practice 1
    2. Click System
    3. In the search field type advance system
      VDI practice 3
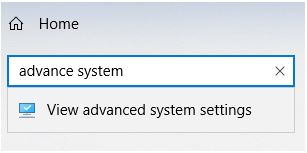
    4. Click View advanced system settings
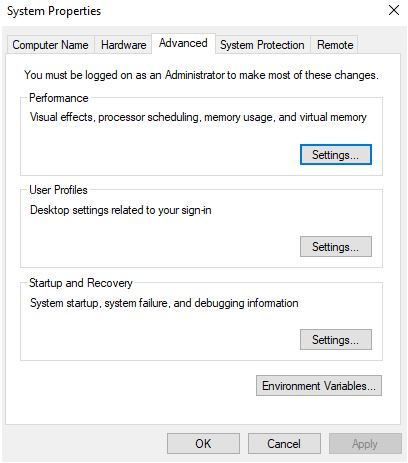
    5. Under the advanced tab, under performance click settings
      VDI practice 4
    6. Click adjust for best performance and click ok
      VDI practice 6


      This Section Applies for Users Running AutoDesk Revit - Optimizing Revit Workflows on VDI

      1. For optimal performance, user profiles should be as small as possible. Ensure enough free disk space is on your VDI proportionate to the size of your central model(s) you are creating a copy of locally.  Periodically clear temp files (%temp%), Autodesk temp install directory (C:\Autodesk\), Downloads, and local copies of central models (in ‘My Documents’ usually) including _backup folders correlating with the rvt files.
      2. Rendering uses a lot of system resources and works best when run on a dedicated client computer or utilizing a back-end distributed rendering system such as v-ray swarm.  Rendering and other CPU intensive tasks: Renderings or running benchmarks can easily monopolized your entire local Compute (Your local Desktop) resources, it is highly recommended to utilize alternate Compute sources (Rendering Compute) separate of your local Compute.  By utilizing a dedicated Rendering Compute for products such as V-Ray Swarm and alike will vastly speedup renderings tasks and maintains the integrity of your local Compute. This practice will facilitate the use of such products to their fullest potential as jobs are divided into smaller chunks and spreading simultaneously across several Compute resources.   This best strategy to allowing users to continually send render jobs to at any time without a performance impact to their local desktop.  V-Ray has plugins for Rhino, Revit, Sketchup, 3dsMax and other common design software.
      3. Upgrading Revit models consumes a lot of memory and can have an adverse effect on other users working on the same server. If you are going to be doing a lot of it, you may consider upgrade models on a separate computer running Revit before opening these models in the VDI environment.
      4. Turn off shadows for all printed views if not absolutely necessary.
      5. Use section boxes or crop regions to limit working area.
      6. Set detail level to Coarse or Medium.
      7. Set the following in Revit Options:
        • Set Tooltip Assistance to "none."
        • Turn off the ViewCube.
        • Turn off 3 options for SteeringWheel Text Visibility.
      8. In general, the following characteristics of a building model can affect performance:
        • Complex geometry
        • Multiple parametric relationships
        • Multiple constraints
        • Linked files

      Inside Revit Models

      1. Open the model at least once a day creating a new local copy by browsing to the central and not using the recent files list.
      2. Address warnings regularly and correct them. The more warnings will lead to slower performance.  The continual tracking of these warnings by Revit will increase the file size and drastically affect the model performance if left unmanaged.  Warnings that should have priority to be addressed are those involving calculations… such as areas, rooms, spaces, joined elements, analytical elements, and MEP systems.
      3. Purge regularly and avoid loading too many families in the model that you don’t need because this increases file size. Purge out what you don’t need.  You can always add something if you need it from your family library.  If there are families in your project that you don’t have in the library, but don’t need in the current project, you can export them out and save them to your library freeing up space in your model.
      4. Avoid locking / constraining too many elements
      5. Put revit links on their own worksets so that they can be unloaded completely from memory when opening a project rather than just using the unload link feature which removes it from sight, but it is still in system memory.
      6. Link CAD files rather than inserting directly into your Revit project. When links are no longer needed, remove them rather than just unload.
      7. If you must have elements directly imported from CAD rather than redraw it natively in Revit, import the CAD detail in a separate revit file (NOT the main project file) to clean it up first such as removing CAD symbols, hatches, layers, and linestyles. Then copy/past or insert view.
      8. Remove old design options that are no longer needed. Revit has to consider each design option (even if turned off from view) and that can lead to slow model performance.
      9. Perform regular audits/compact the model when opening it. Daily or at least once a week.
      10. Reduce image sizes before importing
      11. Restart Revit to reset memory cache because Revit uses a lot of system RAM
      12. If possible, turn off Volume Calculations or set to calculate areas until needed.
      13. Don’t abuse groups. If something is very repetitive, consider creating families instead of grouping because they use less resources
      14. Don’t over-model families. If you need a highly detailed family, put the complex geometry on the highest detail level so it’s not normally seen, but can be turned on when you need it.
      15. Create a new central file occasionally if need be. Have all users exit out during this process and have users open up new central and obtain local copies of it when finished with the process.  Caution:  This destroys all backups of the central model.

      Consider the following best practices for managing views in your project.

      1. To improve performance when opening the project, set a drafting view with few if any elements as the starting view. See Specify the Starting View for a Model.
      2. Minimize view depth where possible in elevation, plan, and section views so that geometry hidden by other elements in the view does not affect the view drawing performance. See About the View Range.
      3. Consider back-clipping views to reduce the quantity of geometry maintained in a view. Often the overhead associated with additional object cutting due to back clipping is more than offset by the resulting reduced geometry maintenance. See Cut a Plan View at a Clip Plane.
      4. Use section boxes to limit visible geometry when working in a 3D view. See Change the Extents of a 3D View.
      5. Minimize the number of views in a project to reduce model size. Likewise, consider deleting as many views as possible from static models linked into the model.
      6. Use Wireframe or Shading display styles when working in a linked file environment. See Visual Styles.
      7. Avoid hiding large quantities of individual elements in views.
      8. Turn off unnecessary categories in Visibility/Graphics and templates. See About the Visibility and Graphic Display Dialog.
      9. When you use the Paste Aligned tool to closed views, target views will open and close. When repeating this several times, you can improve performance by opening all the target views before beginning the sequence of paste operations. Paste Aligned Elements.
      10. Zoom in to speed up drawing and snapping.
      11. If you have a dense view and snap lines appear to be shooting off in all directions, deselect the Snap to Remote Objects setting in the snap dialog. See Snaps Dialog.
      12. Close unnecessary views.
        • When working in a 3D view, most of the file is placed into RAM. These views should be closed when saving to central, because Revit will update this complex view as part of the save process.
        • Although Revit is optimized to update only views that are visible or become visible to the user, you can close hidden views to recover memory allocated to those views.
      13. Assign the proper level of visual detail to a given view. In a 1/8" plan view, assigning a Fine level of display detail may be unnecessary. Plan views with fine and medium detail level are slow to open if there are many wall join layers to route. Use a Coarse view setting unless you need to show greater detail. See Specify the Detail Level for a View.
      14. Unless necessary, turn off shadows in views and before printing. See Display Sun and Shadows.
      15. Use the Draw visible elements only graphics setting to reduce the amount of information drawn during view navigation. This will also optimize the speed when panning, zooming, and orbiting the model. See Options Dialog: Graphics Tab.